Sourdough Discard Crackers

Cheddar & Butter Sourdough Crackers

These recipes use discard starter, and make a pourable batter rather than a dough that you have to rise and roll out. Easy! Just spread it out evenly and bake. 

For best results, the sourdough discard should be at 100% hydration. This means that you need to feed your starter with equal amounts of flour and water – 1:1:1 existing starter, flour, and water. I usually discard (or use up) all but 100g of starter, and feed it with 100g of water and 100g of flour (usually whole wheat, but sometimes rye or white, or whatever you have on hand will do). 1:1:1 makes 100% hydration starter, because amount of water used is 100% the amount of flour, by weight. 

I have been asked if it is necessary to stir down sourdough starter before using it in a recipe. If you’re using sourdough starter to leaven bread, don’t stir it down – you want those bubbles to rise the bread. For crackers, however, you can stir it down, or not bother – you’re going to whisk the batter, and that will stir down any air bubbles that may exist. 

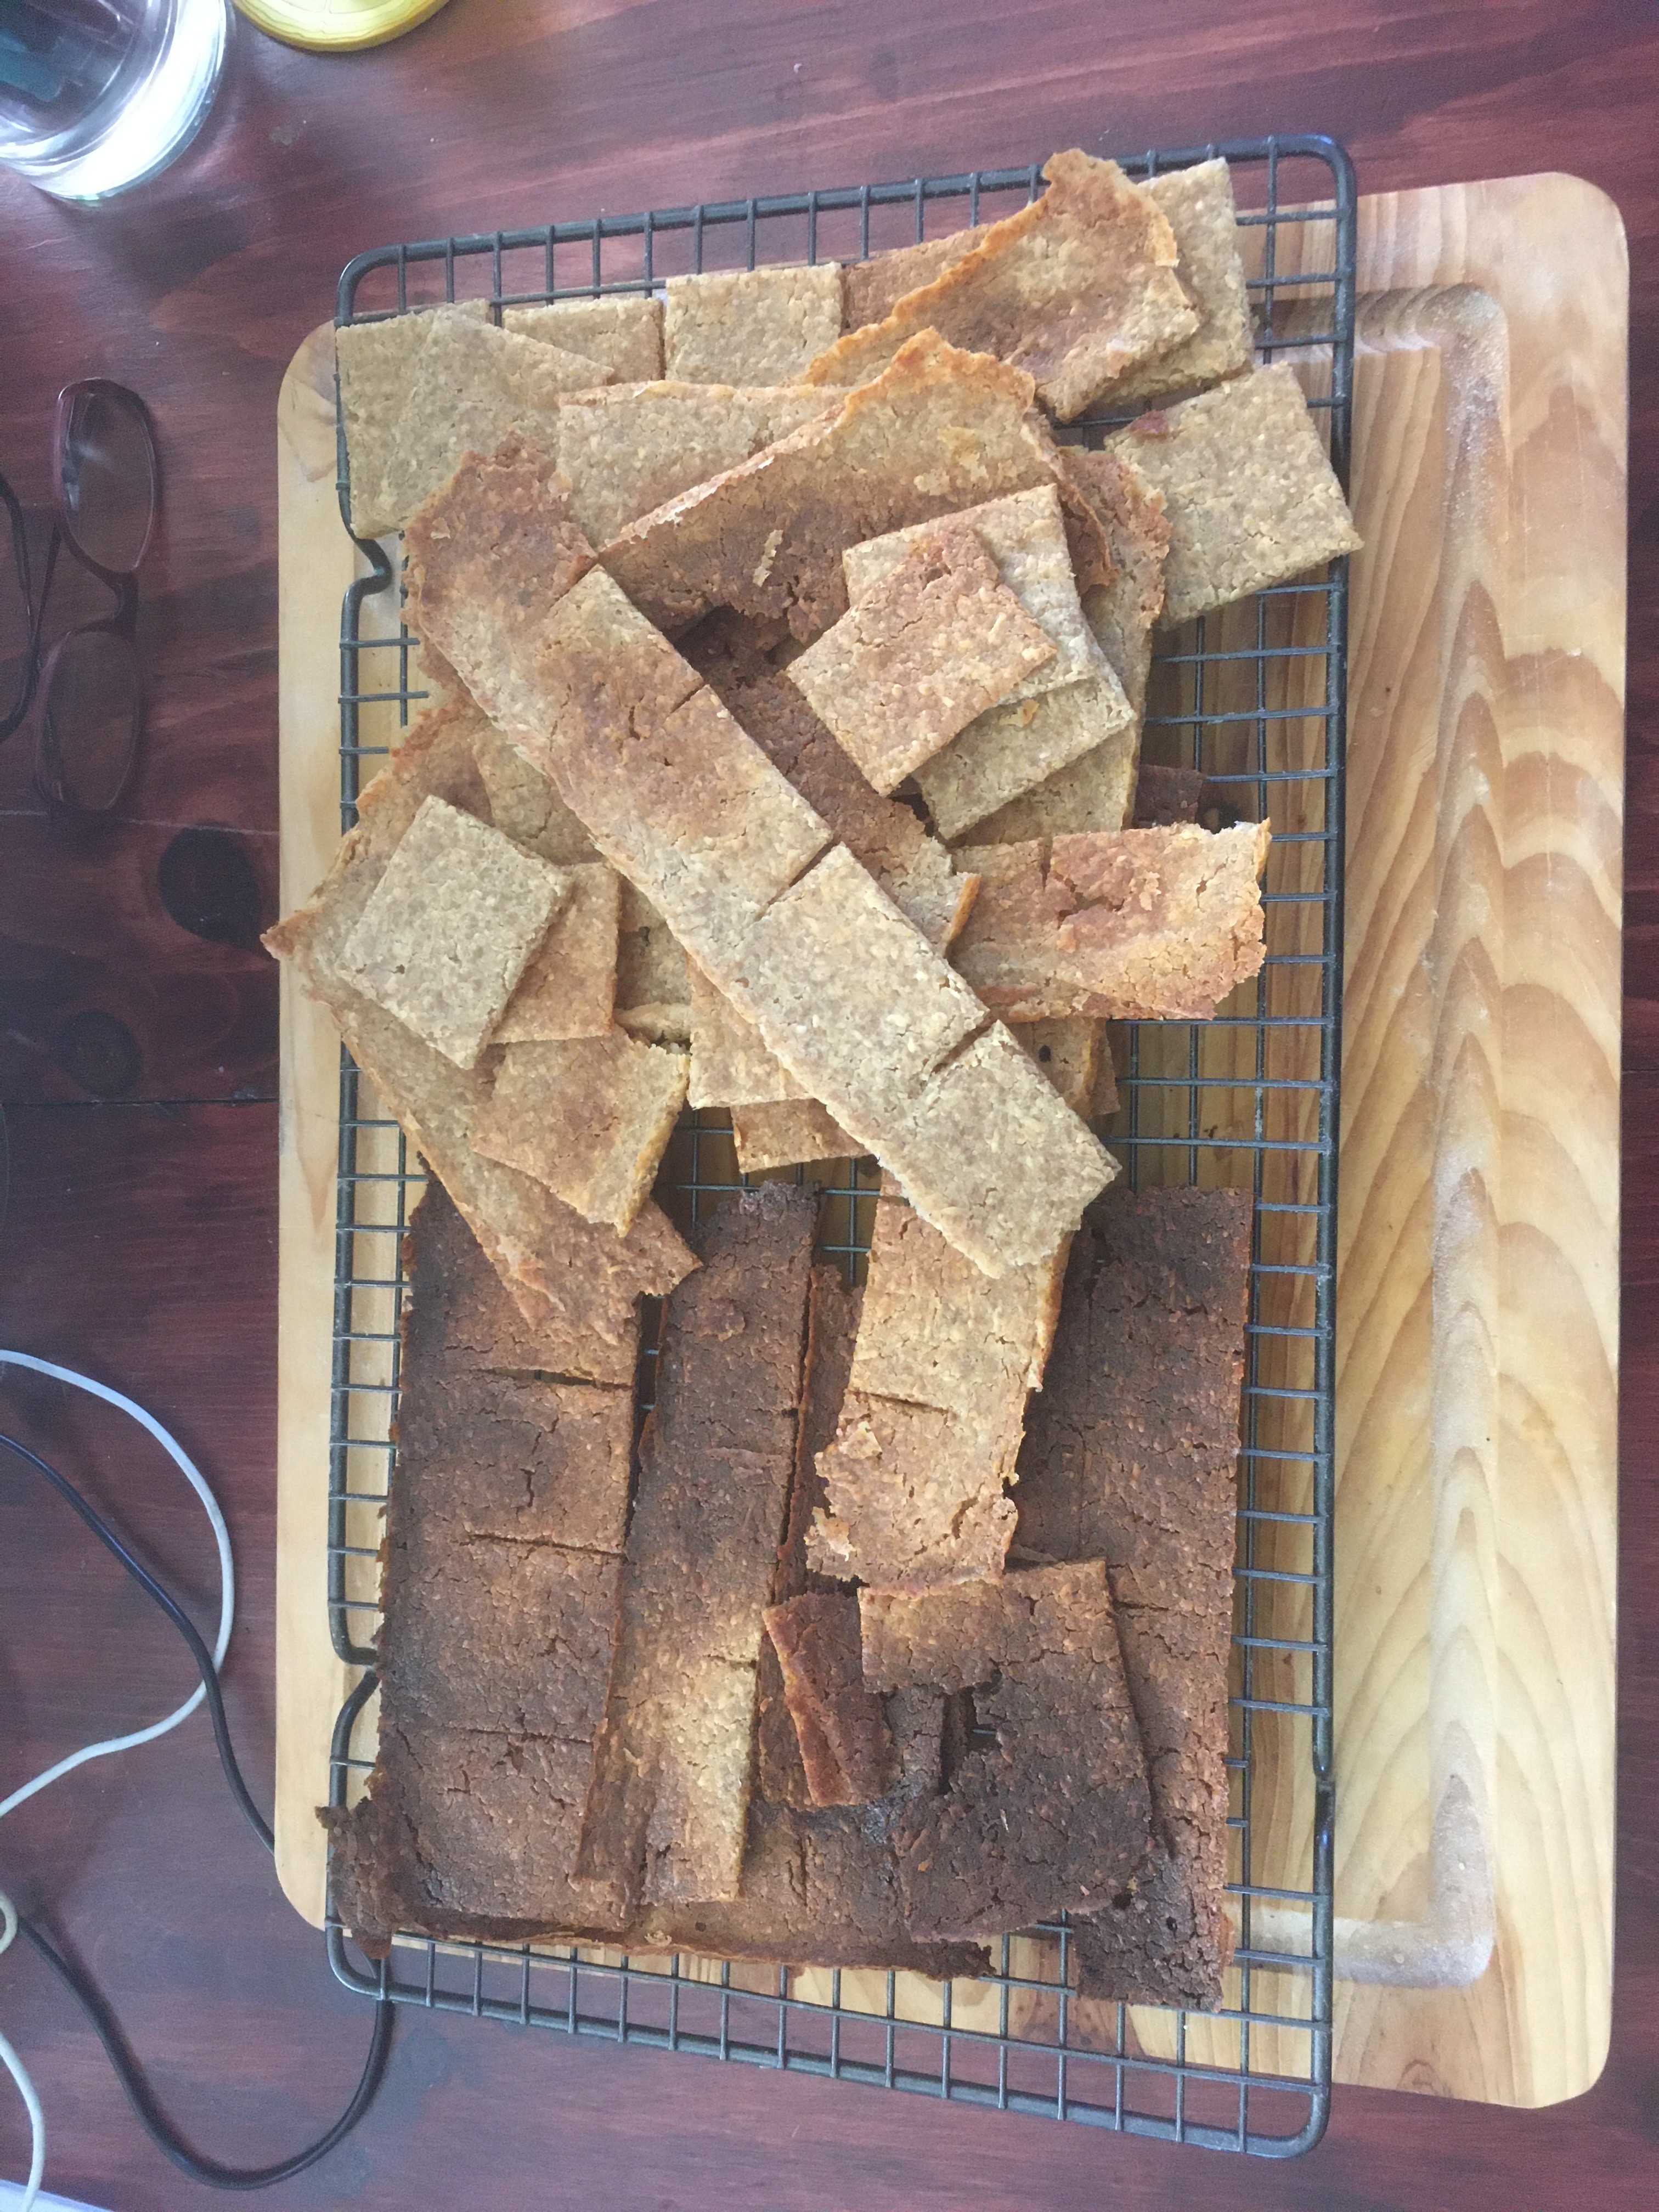
Lately I have been feeding my starter with whole wheat flour, so my crackers are 100% whole wheat. They browned a little more than crackers made with white flour, but they have more flavour, and are practically health food (at least, that what I’m telling myself). These are not saltines, and don’t look or taste like saltines.  

There is a pronounced sourdough flavour to these crackers, and I like it. They are deeply savoury. As they baked, the aroma and steam of the sourdough would roll out of the oven when I opened the oven door. Very tangy!

So far, I have just eaten the crackers right out of the pan, but they would be good with cheese or charcuterie or dips too. I find that, similar to sourdough bread, when I get that sour flavour on my palate, I crave more of it. Good thing I made several batches of crackers!

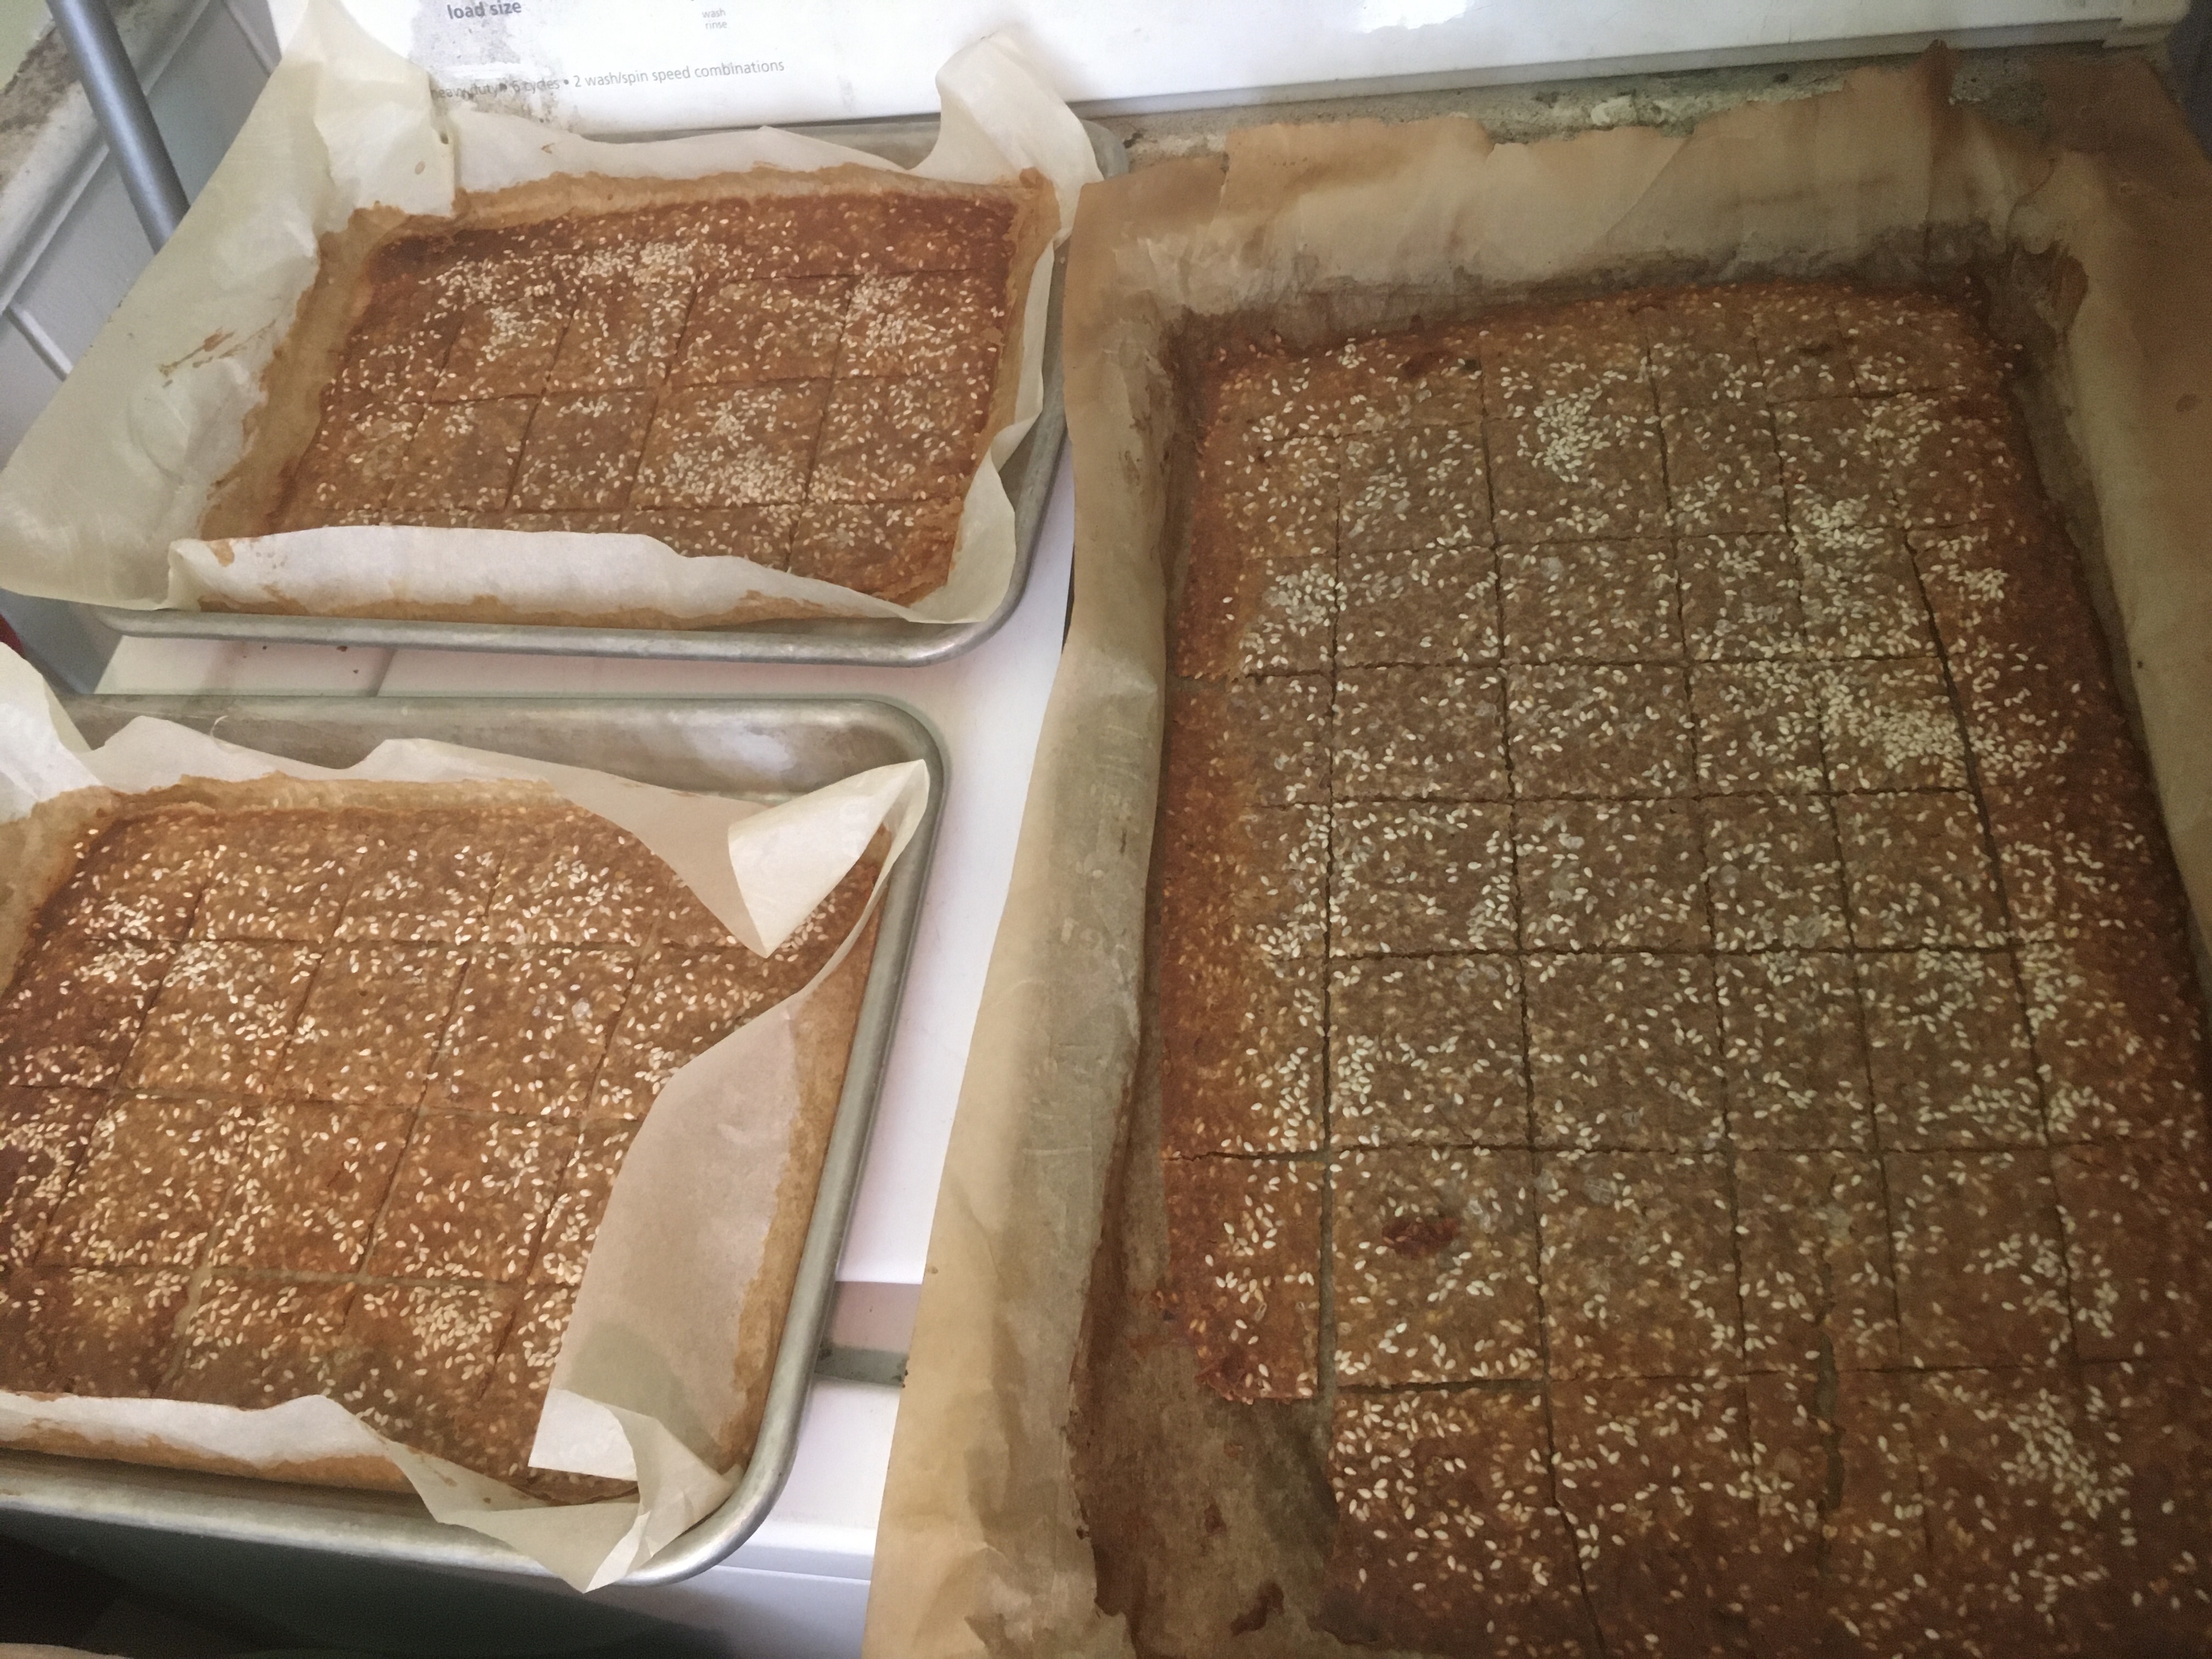
It is important that the batter is spread thinly and evenly over the baking sheet. I used one 12×18” cookie sheet and two 9×13” cookie sheets, and baked two batches at a time. If it is uneven, the thin spots will burn while the thick spots will be chewy. 

The recipe variations that have cheese are thicker and take more work to spread evenly; the other versions pour out of the mixing bowl, and can be evened-up by shaking the pan after you spread the batter out. My pans are not new, and are a little warped, which I think explains why it was difficult to get the batter evenly spread. 

I have made all of the variations below, and have found that the versions that use butter burn more easily.  I have modified the recipes to use half melted butter and half olive oil – best of both worlds. Watch them carefully, and be prepared to take them out early, if needed. Your oven might have hot spots, or the thermostat might not be accurate. 

The butter versions are good (I will never publicly admit that butter isn’t better) but they are very rich, because they also have cheese. I guess I should have tried to create a butter version that didn’t include cheese, but I used up all my discard starter today (all 3 quarts of it!), so that’s a project for another day. 

I made crackers flavoured with pesto and garlic aioli because I found 2 different dip mixes in the back of my spice cupboard, and thought they would make good crackers. The pesto dip mix I have was quite flavourful, and it’s possible that I used too much of it. I was hoping for a vegetable-thins sort of flavour, and they are a little strong. If you have a dip mix you want to use, try it – I was thinking about a ranch-flavoured cracker, and this was as close as I came. The pesto dip mix has a lot of herbs in it, and, combined with the whole-wheat starter, browned to a dark gray colour that was off-putting at first, but tastes good. These are not saltines, and don’t look or taste like saltines. 

Many of my pans of crackers were thinner at the edges than in the middle (again, because I think my pans are a little warped). I took them out of the oven when the outer edges were browned, and then once they cooled some of the interior crackers crisped up a little. Some of the crackers in the middle of the pan were a little thicker, and stayed chewy, so I put them back in the oven a little longer, and they crisped up eventually. I kind of like a little chew, but it’s not conventional. 

A final note: for the recipes with butter and cheese, you may want to use unsalted butter, or skip the addition of salt to the batter, especially if you plan to sprinkle a little sea salt to the tops of the crackers before they go in the oven. Most cheeses have salt, and you don’t want your crackers to be too salty.  I like the added crunch of sea salt, and I don’t usually buy unsalted butter (although I had some, and used it today), so in future I will omit the salt in the batter. 

Here are the recipes: 

Rosemary Sourdough Crackers

  • 350g sourdough starter discard 
  • 65g olive oil 
  • 5g salt 
  • 4 tsp rosemary 

Sesame Sourdough Crackers

  • 350g sourdough starter discard 
  • 65g olive oil 
  • 5g salt 
  • 2-4 tbsp sesame seeds (depending on how sesame-y you like them)

Pesto Sourdough Crackers

  • 350g sourdough starter discard 
  • 65g olive oil 
  • 5g salt 
  • 4-5 tsp pesto dip mix (or whatever dip mix you have on hand)

Garlic Aioli Sourdough Crackers

  • 350g sourdough starter discard 
  • 65g olive oil 
  • 5g salt 
  • 1 tbsp garlic aioli powder (you could try a smaller amount of garlic powder)

Pecorino & Butter Sourdough Crackers

  • 350g sourdough starter discard 
  • 30g olive oil 
  • 30g melted butter, cooled to room temp* 
  • 5g salt 
  • 75g Pecorino Romano, finely grated (could substitute Grana Padano or Parmesan)

Cheddar & Butter Sourdough Crackers

  • 350g sourdough starter discard 
  • 30g olive oil 
  • 30g melted butter, cooled to room temp* 
  • 5g salt 
  • 75g hard cheddar cheese, finely grated (the firmer the better – easier to grate finely)

*Make sure the melted butter is cooled to room temperature (not fridge temperature) so that it will whisk into the batter and emulsify completely. 

  1. Preheat oven to 325°F. 
  2. Line baking pan(s) with parchment paper. 
  3. Mix together all ingredients. You may want to use a bowl with a pouring spout. 
  4. Whisk until smooth, and all ingredients are fully incorporated. 
  5. Pour the batter onto your prepared baking pan(s), and use a spatula to spread it out evenly. 
  6. If you want to sprinkle some additional salt on top, now’s your chance.  
  7. Bake for 15 minutes and rotate the pan(s). Bake for another 15 minutes and remove from oven. 
  8. Score the batter into crackers using a pizza wheel, ravioli wheel, or a sharp paring knife. I recommend 1.5-2” squares, but you can cut them as large or as small as you like.  
  9. Turn the oven down to 300°F. 
  10. Put the pan(s) back in the oven, and continue baking for 20-30 more minutes, or until golden-brown but not burned. Rotate the pan(s) every 10 minutes (this also allows you to keep an eye on them). 
  11. When you take the pan(s) from the oven, lift the parchment and crackers and place onto a cooling rack. 
  12. Once cool, break the crackers along the lines you scored. 
  13. You may need to return the thicker crackers to the oven for a short time, if they don’t crisp up as they cool. 
  14. Store in an air-tight container. Try not to eat them all at once. 😉

Soft Sourdough Sandwich Bread

My husband doesn’t like crusty bread, so I have tried a few different enriched sourdough recipes — ingredients such as eggs, milk, and oil or butter make a softer loaf. Most of the breads I used to make (before my current obsession with sourdough-only breads) were enriched with butter, eggs, milk, and honey, so I wanted to make a sourdough version of that.

I tried a few recipes I found on the internet. Some had eggs but no milk, some had milk but no oil, etc. Some were too wet to knead, which doesn’t work for me.

I looked at several different recipes, and came up with a formula that has 68% hydration (680g of wet ingredients to 1000g of flour), which is the hydration I use for my basic sourdough bread. I assumed that milk, eggs, oil, and honey all have the same hydration as water, which probably isn’t entirely true, but it worked anyway.

I tried adding the salt after the autolyse, but the dough was almost too stiff to properly knead the salt in after the dough was mixed, so in the recipe below I’ll suggest that the salt should be mixed in with the rest of the ingredients.

The bread rose nicely in the oven. The crust was crisp when hot, but softened as it cooled. The interior has a soft, even crumb, without the large holes that are the trademark of sourdough bread — but perfect for peanut-butter-and-jam sandwiches. because they won’t drip through.

Soft sourdough sandwich bread. In the background you can see my jar of sourdough starter, and today’s dough starting to rise.

Here’s the recipe.

SOFT SANDWICH SOURDOUGH BREAD

Makes 2 loaves

OVERNIGHT LEVAIN
• 100g ripe (fed) mature sourdough starter
• 150g bread flour
• 150g lukewarm water

DOUGH
• all of the overnight levain
• 1000g bread flour
• 240g milk, warmed to 105-115*F
• 240g eggs (4 eggs + enough water to make 240 grams), beaten
• 100g olive oil or melted butter
• 100g honey
• 20g salt

  1. FEED YOUR STARTER: About 6-8 hours before you want to start this recipe, feed your starter to make sure it is active and has risen.
  2. MIX THE LEVAIN: At least 12 hours before you plan to start mixing your dough, make the levain. Combine the mature starter, flour, and water, and mix well. Use a large container with adequate space for the starter to double in size, and a lid. Cover loosely with the lid and leave on the counter overnight. The levain should double in size before you mix the dough.
  3. MIX THE DOUGH: Combine the overnight levain with the flour, milk, eggs, oil, honey, and salt. Mix with a large spatula or wooden spoon. The ingredients should come together easily and produce a shaggy firm dough. Don’t be tempted to add more water; the dough will feel wetter after it hydrates in the next step.
  4. AUTOLYSE: Let the dough relax for about 30 minutes so the flour can absorb the wet ingredients a bit, which will make it easier to knead.
  5. KNEAD: Flour the counter and scrape the dough out onto it. (A dough scraper will help, because the dough will be sticky.) Flour your hands and gather the dough together. Fold the dough toward you, push forward into the dough with the heels of your hands, and give the dough a quarter turn. Fold the elongated dough back toward you, push forward with the heels of your hands, and give the dough a quarter turn. Fold, push, turn. Keep kneading until you can feel that the dough has tightened up and has gotten smoother, usually about 10 minutes. If the dough tightens too much, you can let it rest a few minutes and then continue kneading.
  6. RISE: Cover the bowl (with a plate, or beeswax wrap, or a floured teatowel, or plastic wrap) and let the dough rise for 3 to 4 hours. Halfway through the rise, fold or knead it gently, but don’t punch it down too much, and don’t use a rolling pin. You don’t want to deflate all the air bubbles.
  7. CHECK: After 3 to 4 hours, the risen dough should be lively, aerated, and buoyant. If you aren’t sure, fill a cup with water, pinch off a little ball of your dough, and drop it into the glass. It should float to the top, indicating that your dough is aerated. If it doesn’t seem particularly buoyant, it might be a cold day at your house. No worries. Let it rise a bit longer and check it again in 30 minutes or so.
  8. DIVIDE: Gently turn your dough onto a floured countertop. If it is sticking to the bowl, use your hand or a plastic scraper to release it. Divide the dough into 2 equal pieces – cut with a knife rather than tearing the dough.
  9. SHAPE: For soft sandwich bread that doesn’t have big holes in the crumb, use a rolling pin to remove all the bubbles. Roll the dough into an even thickness and shape into a rectangle, with the short side the same length as your loaf pan. Roll the dough into a log, starting with one of the short ends. Pinch the seam closed and tuck in the ends. Place seam-side down in loaf pans.
  10. PROOF: Let the dough proof for 3 to 4 hours, until risen and puffy. It will rise more in the hot oven.
  11. PREHEAT: While the dough is proofing, preheat the oven to 475-500°F. Great bread needs a thoroughly hot oven for the best results.
  12. CHECK: To test that the dough is well proofed, press a finger gently into the dough. If it seems springy and tight, it needs more time. If it feels airy and light, like a marshmallow, it’s ready to bake. Don’t worry if your dough needs more time to rise.
  13. SLASH: just before the dough goes into the oven, make a half-inch deep lengthwise slash in the top of the dough with a lame, razor blade, or sharp knife. This will allow your loaf to expand and rise while it bakes without tearing.
  14. BAKE: Put the bread in the oven, turn the oven down to 450°F, and bake for 15 minutes. After 15 minutes, turn the oven down to 400°F, and bake for 10-15 minutes more. The finished loaf should be golden brown and will sound hollow when you thump it with your fingers.
  15. COOL: Let the bread cool on a wire rack for at least 30 minutes to let the interior crumb set and make it easier to slice. (Yes, really. You will ruin the texture of the loaf if you cut into it right away. Resist the temptation.)
  16. STORE: Store bread in a cloth bag. Bread stored in a plastic bag will retain too much moisture, and will mould. Once the bread is cut, place it cut-side-down on the counter (inside the cloth bag).
Thunder really likes home-made bread – especially with peanut butter!

Sourdough Pizza

This pizza crust was nice and crispy — it stretched out very thin. It was a little on the chewy side, and had a nice flavour — not too sour.

IMG_2829

Balls of sourdough pizza dough. The sourdough starter is in the glass canister on the counter.


IMG_9035

Preheat the pizza stone (mine’s cast iron) when you preheat the oven. It only takes a few minutes to par-bake the crust. 

SOURDOUGH PIZZA DOUGH

FOR THE LEVAIN
• 50g ripe (fed) mature sourdough starter
• 100g bread flour
• 100g water (100*F)

FOR THE DOUGH
• all of the overnight levain
• 375g bread flour
• 225g water (90*F)
• 14g salt

1. FEED YOUR STARTER: About 6-8 hours before you want to start this recipe, feed your starter to make sure it is active and has risen.

2. MIX THE LEVAIN: At least 12 hours before you plan to start mixing your dough, make the levain. Combine the mature starter, flour, and water, and mix well. Use a large container with adequate space for the starter to double in size, and a lid. Cover loosely with the lid.

3. MIX THE DOUGH: Combine the overnight levain, flour, and water, and mix. The ingredients should come together easily and produce a shaggy firm dough. Don’t be tempted to add more water; the dough will feel wetter after it hydrates in the next step.

4. AUTOLYSE: Let the dough relax for about 30 minutes so the flour can absorb the water a bit, which will make it easier to knead.

5. ADD THE SALT: Sprinkle the salt over the dough. It will mix in as you knead.

6. KNEAD: Flour the counter and scrape the dough out onto it. (A dough scraper will help, because the dough will be sticky.) Flour your hands and gather the dough together. Fold the dough toward you, push forward into the dough with the heels of your hands, and give the dough a quarter turn. Fold the elongated dough back toward you, push forward with the heels of your hands, and give the dough a quarter turn. Fold, push, turn. Keep kneading until you can feel that the dough has tightened up and has gotten smoother, usually about 10 minutes. If the dough tightens too much, you can let it rest a few minutes and then continue kneading.

7. BULK RISE: Cover the bowl (with a plate, or beeswax wrap, or a floured teatowel, or plastic wrap) and let the dough rise for 3 to 4 hours. Halfway through the rise, fold or knead it gently, but don’t punch it down too much, and don’t use a rolling pin. You don’t want to deflate all the air bubbles.

8. CHECK: After 3 to 4 hours, the risen dough should be lively, aerated, and buoyant. If you aren’t sure, fill a cup with water, pinch off a little ball of your dough, and drop it into the glass. It should float to the top, indicating that your dough is aerated. If it doesn’t seem particularly buoyant, it might be a cold day at your house. No worries. Let it rise a bit longer and check it again in 30 minutes or so.

9. DIVIDE: Gently turn your dough onto a floured countertop. If it is sticking to the bowl, use your hand or a plastic scraper to release it. Divide the dough into 3, 4, or 5 equal pieces, depending on the size of pan and the thickness you want for the pizza crust.

10. PRESHAPE: Shape each piece of dough by giving it a gentle letter fold: Fold the far side (12 o’ clock) down to the middle, sealing the dough against itself. Now fold the bottom up to meet the seam and seal it. Turn the dough so this seam is vertical, and do that letter fold again, sealing the dough to itself. You should have a nice little rounded square shape. If the dough is nice and tight, you can stop there. If it seems very relaxed, you can give it another set of letter folds to create more tension, sealing the dough to itself.

11. BENCH REST: Rest the pieces of dough on the counter for 30 minutes. This will give them time to relax before shaping. Dust with flour and lightly cover with the same floury teatowel or plastic wrap you used earlier.

12. SHAPE: Shape each piece into a ball. Place the seam down and pull it against the unfloured counter with your hands to tighten up the loaf. If the counter is unfloured, the dough will stick just a little bit as you pull it toward you, and this will help tighten the surface.

13. PROOF: Put the dough balls on a parchment-lined baking sheet, or on lightly-floured dinner plates, leaving space between the balls to allow for expansion. Lightly flour the tops to prevent sticking, cover with plastic wrap, and let sit out at room temperature to rise for about 5 hours. The dough balls should hold for 4 hours for making pizza. Or refrigerate the dough balls 4 hours after shaping them, then use them to make pizza the next day.

14. PREHEAT the oven to 550°F (or the highest setting) with a pizza stone inside, on the middle rack. Preheat for at least 45 minutes so that the oven is as hot as it will go before you start to bake the pizza.

15. STRETCH: Generously flour your work surface, and shape one ball of dough at a time. Punch down the middle with your fingertips, pushing the air toward the rim of the disk. Leav about a ½ inch of the outer rim un-deflated. Flip the dough over and repeat. (The diameter of the rim of the pizza is determined here—if you want a more bready pizza with big, poofy rims, or if you want a narrow rim, this is the point where you make that happen.) Using floured hands, grab the rim at about the 10 o’clock and 2 o’clock positions and lift so the crust hangs down vertically; preserve the outer rim by placing your thumbs about ¼ to ½-inch from the edge. Let gravity pull the rest of the dough down to stretch it. If the dough is stretching easily, let the bottom of the dough rest on the counter while turning it so you can control the speed and evenness of its expansion. Run the rim between your hands, working all the way around the circumference of the dough a couple of times. You can work as slowly as you want. If the dough gets sticky, set it down and give both the top and the bottom another dusting of flour. Next, make two fists and position them just inside the rim, with the crust still hanging vertically. Gently stretch and turn the dough repeatedly, letting the bottom of the dough pull down, expanding the surface. Keep a close eye on the thickness of the dough. There is no benefit to overstretching it – when it’s done, it’s done. You want the dough thin, but you don’t want it so thin that it tears or can’t support the weight of the toppings. If you end up with a small tear, don’t panic—it’s okay to patch it by folding a small bit of dough over the hole. Place the dough on a flour-dusted pizza peel, if you have one, or onto an upside-down parchment-lined baking pan. Both of these will allow you to slide the pizza onto the hot pizza stone.

16. PAR-BAKE: If you like a thin crust and a lot of toppings, par-bake the dough before adding toppings. If you like thick crust, or few toppings, you can top the pizza before baking. If it’s plain and unsauced, the middle of the pizza crust will bubble up, so pull it out after just 45 to 60 seconds in a super-hot oven; it may take a little longer if your oven doesn’t go up past 500*F.

17. ADD TOPPINGS: Spread sauce over the dough – not too thickly – using a small ladle or a large serving spoon, smoothing and spreading the sauce with the back of the spoon. Scatter the toppings over the surface, using only moderate amounts so as not to add more weight than the dough can handle.

18. BAKE: Transfer the pizza to the oven by sliding the pizza from the peel or pan onto the hot pizza stone. Bake for 5 minutes and broil for 2 minutes, or until it is cooked to your liking. You may need to rotate the pizza, or move the stone into or away from a hot spot in your oven. The goal is for the toppings, bottom of the crust, and rim to all reach their point of perfect baking at the same instant.

L to R: today’s bread dough rising in a banneton, levain for tomorrow’s dough rising in mixing bowl, sourdough starter in glass jar, pizza dough balls in plastic containers, just out of the fridge

1.5x Sourdough

Today I’m making a larger batch of sourdough — 1.5x the size of the usual recipe. I plan to get 4 smaller loaves instead of two large ones.

It was a lot of dough to mix at once! Thankfully I have a 6.5 quart mixing bowl, so there was room to mix and rise it, but the weight of the glass bowl + levain + flour + water overwhelmed my little kitchen scale. I think I got to 800g of water before the scale quit, so then I measured another 220g of water separately and added it — but the dough was a little stickier than I expected, so I might have added too much. I kneaded in a little more bench flour, and it worked fine.

I only have 2 bannetons (proofing baskets), so I used 2 bowls lined with parchment paper for the other two loaves. They will proof seam-side down, and I’ll just lift them, by the parchment, into the hot Dutch ovens for baking. The dough in the bannetons is seam-side-up, because it gets flipped into the hot Dutch ovens for baking.

The bread is still proofing. I’ll post photos after it has baked.

Basket of bread = excellent air freshener in the car!

Seems like the only time I get in the car is to porch-drop some bread . . .  😉

Here’s the recipe.

1.5x SOURDOUGH BREAD

Makes 4 small loaves

FOR THE LEVAIN
• 150g ripe (fed) mature sourdough starter
• 225g bread flour
• 225g lukewarm water

FOR THE DOUGH
• all of the overnight levain
• 1500g bread flour
• 1020g lukewarm water
• 30g salt

1. FEED YOUR STARTER: About 6-8 hours before you want to start this recipe, feed your starter to make sure it is active and has risen.

2. MIX THE LEVAIN: At least 12 hours before you plan to start mixing your dough, make the levain. Combine the mature starter, flour, and water, and mix well. Use a large container with adequate space for the starter to double in size, and a lid. Cover loosely with the lid.

3. CHECK: After 12 hours, check to see if your levain is full of air and has doubled in size. If you aren’t sure if it’s ready, use the “float test.” Drop a small piece of levain into a glass of water to see if it floats. If it doesn’t float, the levain needs more time to develop.

4. MIX THE DOUGH: Combine the prepared levain, flour, and water, and mix. The ingredients should come together easily and produce a shaggy firm dough. Don’t be tempted to add more water; the dough will feel wetter after it hydrates in the next step.

5. AUTOLYSE: Let the dough relax for about 30 minutes so the flour can absorb the water a bit, which will make it easier to knead.

6. ADD THE SALT: Sprinkle the salt over the dough. It will mix in as you knead.

7. KNEAD: Flour the counter and scrape the dough out onto it. (A dough scraper will help, because the dough will be sticky.) Flour your hands and gather the dough together. Fold the dough toward you, push forward into the dough with the heels of your hands, and give the dough a quarter turn. Fold the elongated dough back toward you, push forward with the heels of your hands, and give the dough a quarter turn. Fold, push, turn. Keep kneading until you can feel that the dough has tightened up and has gotten smoother, usually about 10 minutes. If the dough tightens too much, you can let it rest a few minutes and then continue kneading.

8. RISE: Cover the bowl (with a plate, or beeswax wrap, or a floured teatowel, or plastic wrap) and let the dough rise for 3 to 4 hours. Halfway through the rise, fold or knead it gently, but don’t punch it down too much, and don’t use a rolling pin. You don’t want to deflate all the air bubbles.

9. CHECK: After 3 to 4 hours, the risen dough should be lively, aerated, and buoyant. If you aren’t sure, fill a cup with water, pinch off a little ball of your dough, and drop it into the glass. It should float to the top, indicating that your dough is aerated. If it doesn’t seem particularly buoyant, it might be a cold day at your house. No worries. Let it rise a bit longer and check it again in 30 minutes or so.

10. DIVIDE: Gently turn your dough onto a floured countertop. If it is sticking to the bowl, use your hand or a plastic scraper to release it. Divide the dough into 4 equal pieces.

11. PRESHAPE: Shape each piece of dough by giving it a gentle letter fold: Fold the far side (12 o’ clock) down to the middle, sealing the dough against itself. Now fold the bottom up to meet the seam and seal it. Turn the dough so this seam is vertical, and do that letter fold again, sealing the dough to itself. You should have a nice little rounded square shape. If the dough is nice and tight, you can stop there. If it seems very relaxed, you can give it another set of letter folds to create more tension, sealing the dough to itself.

12. BENCH REST: Rest the 4 pieces of dough on the counter for 30 minutes. This will give them time to relax before shaping. Dust with flour and lightly cover with the same floury teatowel or plastic wrap you used earlier.

13. SHAPE: Shape each piece into a boule. Flip the dough over and give it a letter fold, give it a quarter turn, and then give it another letter fold. Place the seam down and pull it against the unfloured counter with your hands to tighten up the loaf. If the counter is unfloured, the dough will stick just a little bit as you pull it toward you, and this will help tighten the surface.

14. PROOF: Place each loaf seam-side-up into a proofing basket lined with a floured teatowel, or parchment. If you don’t have a banneton, use a parchment-lined bowl, and place the dough seam-side-down. Let the dough proof for 1 to 2 hours. This is the final rise before it hops into the oven.

15. PREHEAT: While the dough is proofing, put an empty cast-iron Dutch oven inside the oven and preheat it to 475°F. This may seem early to preheat the oven, but great bread needs a thoroughly hot oven for the best results.

16. CHECK: To test that the dough is well proofed, press a finger gently into the dough. If it seems springy and tight, it needs more time. If it feels airy and light, like a marshmallow, it’s ready to bake. Don’t worry if your dough needs more time to rise.

17. BAKE: Carefully pull your very hot Dutch oven out of the oven and place it on top of the stove with the lid next to it. Carefully tip 1 loaf out of a basket into the Dutch oven, seam-side down. (If you’re using bowls lined with parchment paper, lift them by the parchment and lower them into the hot Dutch oven). Make 2 half-inch deep slashes in the top of the dough with a razor blade or lame, making a big X. This will allow your loaf to expand upward in all directions and rise while it bakes without tearing. Cover the Dutch oven with the lid, slide it into the oven, and bake for 25 minutes.

18. CHECK: At 25 minutes, take the lid off the Dutch oven. Continue baking with the cover removed for another 15 to 20 minutes. Your loaf will get some colour and develop a nice crust. The finished loaf should be golden brown and will sound hollow when you thump it with your fingers. If the loaf seems to be browning too quickly, turn your oven down to 450°F. Repeat to bake the second loaf.

19. COOL: Let the bread cool on a wire rack for at least 30 minutes to let the interior crumb set and make it easier to slice. (Yes, really. You will ruin the texture of the loaf if you cut into it right away. Resist the temptation.)

20. STORE: Store bread in a cloth bag. Bread stored in a plastic bag will retain too much moisture, and will mould. Once the bread is cut, place it cut-side-down on the counter (inside the cloth bag).

Rye Sourdough Bread

Yesterday I modified my basic sourdough recipe again, this time to make a rye bread. I love caraway rye bread with a little Cheez Whiz — in fact, that’s the only time I ever eat Cheez Whiz.

I was working on a specific timeline yesterday, so I added a 1/2 teaspoon yeast to the dough to speed up the rising time a little. It would be fine without the addition of yeast, as long as your starter is active and doubles after you feed it.

I used 40% rye flour and 60% white bread flour, because I has been my experience that rye does not have enough gluten on its own. Maybe I should try a 100% rye loaf sometime — but this one was destined for a friend, and I didn’t want to risk it yesterday. I have made non-sourdough rye in the past, and when I checked the recipes, they varied between 37% and 42% rye, so I settled on 40% rye.

Coming out of the oven, the loaves were light for their size, which tells me that they are full of bubbles! The crust is a little darker than I’d planned, mostly because I’m working from home and forgot to turn the oven down when I took the lids off the Dutch ovens. The crust is fairly thin, but definitely crusty. The interior of the loaf is a little moist, but fully cooked.

I love the flavour of caraway seeds in rye bread — when I think of rye bread, I think of caraway rye, so I always add caraway seeds to my rye dough. The smell of the caraway in the kitchen as the bread is baking is wonderful.

Once again, I made a small round loaf for myself and a large oval loaf to porch-drop to friends. I have decided that if I have to work online from home, then a little drive is a nice reward for sitting hunched over my laptop for 12+ hours a day. Making the bread only takes a few minutes every few hours.

Here’s the recipe:

RYE SOURDOUGH BREAD

Makes 2 loaves

FOR THE LEVAIN
• 100g ripe (fed) mature sourdough starter
• 100g bread flour
• 50g rye flour
• 150g lukewarm water

FOR THE DOUGH
• all of the overnight levain
• 600g bread flour
• 400g rye flour
• 710g lukewarm water
• 1 tbsp caraway seeds, lightly crushed with mortar and pestle
• 20g salt

1. FEED YOUR STARTER: About 6-8 hours before you want to start this recipe, feed your starter to make sure it is active and has risen.

2. MIX THE LEVAIN: At least 12 hours before you plan to start mixing your dough, make the levain. Combine the mature starter, flour, and water, and mix well. Use a large container with adequate space for the starter to double in size, and a lid. Cover loosely with the lid.

3. CHECK: After 12 hours, check to see if your levain is full of air and has doubled in size. If you aren’t sure if it’s ready, use the “float test.” Drop a small piece of levain into a glass of water to see if it floats. If it doesn’t float, the levain needs more time to develop.

4. MIX THE DOUGH: Combine the overnight levain, flour, water, caraway, and mix. The ingredients should come together easily and produce a shaggy firm dough. Don’t be tempted to add more water; the dough will feel wetter after it hydrates in the next step.

5. AUTOLYSE: Let the dough relax for about 30 minutes so the flour can absorb the water a bit, which will make it easier to knead.

6. ADD THE SALT: Sprinkle the salt over the dough. It will mix in as you knead.

7. KNEAD: Flour the counter and scrape the dough out onto it. (A dough scraper will help, because the dough will be sticky.) Flour your hands and gather the dough together. Fold the dough toward you, push forward into the dough with the heels of your hands, and give the dough a quarter turn. Fold the elongated dough back toward you, push forward with the heels of your hands, and give the dough a quarter turn. Fold, push, turn. Keep kneading until you can feel that the dough has tightened up and has gotten smoother, usually about 10 minutes. If the dough tightens too much, you can let it rest a few minutes and then continue kneading.

8. RISE: Cover the bowl (with a plate, or beeswax wrap, or a floured teatowel, or plastic wrap) and let the dough rise for 3 to 4 hours. Halfway through the rise, fold or knead it gently, but don’t punch it down too much, and don’t use a rolling pin. You don’t want to deflate all the air bubbles.

9. CHECK: After 3 to 4 hours, the risen dough should be lively, aerated, and buoyant. If you aren’t sure, fill a cup with water, pinch off a little ball of your dough, and drop it into the glass. It should float to the top, indicating that your dough is aerated. If it doesn’t seem particularly buoyant, it might be a cold day at your house. No worries. Let it rise a bit longer and check it again in 30 minutes or so.

10. DIVIDE: Gently turn your dough onto a floured countertop. If it is sticking to the bowl, use your hand or a plastic scraper to release it. Divide the dough into 2 equal pieces.

11. PRESHAPE: Shape each piece of dough by giving it a gentle letter fold: Fold the far side (12 o’ clock) down to the middle, sealing the dough against itself. Now fold the bottom up to meet the seam and seal it. Turn the dough so this seam is vertical, and do that letter fold again, sealing the dough to itself. You should have a nice little rounded square shape. If the dough is nice and tight, you can stop there. If it seems very relaxed, you can give it another set of letter folds to create more tension, sealing the dough to itself.

12. BENCH REST: Rest the 2 pieces of dough on the counter for 30 minutes. This will give them time to relax before shaping. Dust with flour and lightly cover with the same floury teatowel or plastic wrap you used earlier.

13. SHAPE: Shape each piece into a boule. Flip the dough over and give it a letter fold, give it a quarter turn, and then give it another letter fold. Place the seam down and pull it against the unfloured counter with your hands to tighten up the loaf. If the counter is unfloured, the dough will stick just a little bit as you pull it toward you, and this will help tighten the surface.

14. PROOF: Place each loaf seam-side-up into a proofing basket lined with a floured teatowel, or parchment. Let the dough proof for 1 to 2 hours. This is the final rise before it hops into the oven.

15. PREHEAT: While the dough is proofing, put an empty cast-iron Dutch oven inside the oven and preheat it to 475°F. This may seem early to preheat the oven, but great bread needs a thoroughly hot oven for the best results.

16. CHECK: To test that the dough is well proofed, press a finger gently into the dough. If it seems springy and tight, it needs more time. If it feels airy and light, like a marshmallow, it’s ready to bake. Don’t worry if your dough needs more time to rise.

17. BAKE: Carefully pull your very hot Dutch oven out of the oven and place it on top of the stove with the lid next to it. Carefully tip 1 loaf out of a basket into the Dutch oven, seam-side down. Make 2 half-inch deep slashes in the top of the dough with a razor blade or lame, making a big X. This will allow your loaf to expand upward in all directions and rise while it bakes without tearing. Cover the Dutch oven with the lid, slide it into the oven, and bake for 25 minutes.

18. CHECK: At 25 minutes, take the lid off the Dutch oven. Continue baking with the cover removed for another 15 to 20 minutes. Your loaf will get some colour and develop a nice crust. The finished loaf should be golden brown and will sound hollow when you thump it with your fingers. If the loaf seems to be browning too quickly, turn your oven down to 450°F. Repeat to bake the second loaf.

19. COOL: Let the bread cool on a wire rack for at least 30 minutes to let the interior crumb set and make it easier to slice. (Yes, really. You will ruin the texture of the loaf if you cut into it right away. Resist the temptation.)

20. STORE: Store bread in a cloth bag. Bread stored in a plastic bag will retain too much moisture, and will mould. Once the bread is cut, place it cut-side-down on the counter (inside the cloth bag).

100% Multigrain Sourdough Bread

IMG_2816

100% Multigrain Sourdough Bread

Today I experimented with a 100% multigrain sourdough bread — actually, I started last night with the levain, but close enough. I was afraid that the multigrain flour might have been too heavy for the sourdough starter to rise, but it turned out well! The crust is crisp, and the crumb is soft and a little chewy.

And the flavour! The multigrain flour gives it a little sweetness, and a little nuttiness. It’s hard to believe that this loaf of bread was made with just 3 ingredients: flour, water, and salt. (The sourdough starter is just flour and water too.) It tastes like more than that, however. I guess the time that it took for the sourdough to mature, for the levain to develop, and for the bread to rise, has to count too.

I know that whole-grain flours soak up more water than white flour, so I added a little more water to this dough — 740 grams. I think it was too much. The dough was sticky when I kneaded it, and I ended up using a cup or more of bench flour to remedy that. For this reason, in the recipe below, I cut back on the water to 700 grams. The recipe worked this way, but I think it would have been better if I had added less water in the first place. You live, you learn.

When I shaped the bread into loaves, I decided to make one little round loaf to keep, and one large oval loaf to give away.  (I have one round cast-iron Dutch oven, and one larger oval Dutch oven. That’s why my bread always looks like that). I’m having trouble eating all the bread I keep for myself, and I want to try each new recipe I make, and I can’t stop making it . . . so a small loaf to leave at home makes sense.

Anyway, I porch-dropped the large loaf before I remembered to take photos of it. Oops. And I forgot to take photos of the little one until after I had sliced it — can you tell in the photo above?

IMG_1650

100% Multigrain sourdough bread

I will definitely make this bread again. Here’s the recipe.

100% MULTIGRAIN SOURDOUGH BREAD

I used Robin Hood “Best for Bread” multigrain flour in this recipe. The package says it contains a blend of cracked wheat, cracked rye, and whole flax.

Makes 2 loaves

FOR THE LEVAIN
• 100 grams ripe (fed) mature sourdough starter
• 150 grams multigrain bread flour
• 150 grams lukewarm water

FOR THE DOUGH
• all of the overnight levain
• 1000 grams multigrain bread flour
• 700 grams lukewarm water
• 20 grams salt

1. FEED YOUR STARTER: About 6-8 hours before you want to start this recipe, feed your starter to make sure it is active and has risen.

2. MIX THE LEVAIN: At least 12 hours before you plan to start mixing your dough, make the levain. Combine the mature starter, flour, and water, and mix well. Use a large container with adequate space for the starter to double in size, and a lid. Cover loosely with the lid.

3. CHECK: After 12 hours, check to see if your levain is full of air and has doubled in size. If you aren’t sure if it’s ready, use the “float test.” Drop a small piece of levain into a glass of water to see if it floats. If it doesn’t float, the levain needs more time to develop.

4. MIX THE DOUGH: Combine the prepared levain, flour, and water, and mix. The ingredients should come together easily and produce a shaggy firm dough. Don’t be tempted to add more water; the dough will feel wetter after it hydrates in the next step.

5. AUTOLYSE: Let the dough relax for about 30 minutes so the flour can absorb the water a bit, which will make it easier to knead.

6. ADD THE SALT: Sprinkle the salt over the dough. It will mix in as you knead.

7. KNEAD: Flour the counter and scrape the dough out onto it. (A dough scraper will help, because the dough will be sticky.) Flour your hands and gather the dough together. Fold the dough toward you, push forward into the dough with the heels of your hands, and give the dough a quarter turn. Fold the elongated dough back toward you, push forward with the heels of your hands, and give the dough a quarter turn. Fold, push, turn. Keep kneading until you can feel that the dough has tightened up and has gotten smoother, usually about 10 minutes. If the dough tightens too much, you can let it rest a few minutes and then continue kneading.

8. RISE: Cover the bowl (with a plate, or beeswax wrap, or a floured teatowel, or plastic wrap) and let the dough rise for 3 to 4 hours. Halfway through the rise, fold or knead it gently, but don’t punch it down too much, and don’t use a rolling pin. You don’t want to deflate all the air bubbles.

9. CHECK: After 3 to 4 hours, the risen dough should be lively, aerated, and buoyant. If you aren’t sure, fill a cup with water, pinch off a little ball of your dough, and drop it into the glass. It should float to the top, indicating that your dough is aerated. If it doesn’t seem particularly buoyant, it might be a cold day at your house. No worries. Let it rise a bit longer and check it again in 30 minutes or so.

10. DIVIDE: Gently turn your dough onto a floured countertop. If it is sticking to the bowl, use your hand or a plastic scraper to release it. Divide the dough into 2 equal pieces.

11. PRESHAPE: Shape each piece of dough by giving it a gentle letter fold: Fold the far side (12 o’ clock) down to the middle, sealing the dough against itself. Now fold the bottom up to meet the seam and seal it. Turn the dough so this seam is vertical, and do that letter fold again, sealing the dough to itself. You should have a nice little rounded square shape. If the dough is nice and tight, you can stop there. If it seems very relaxed, you can give it another set of letter folds to create more tension, sealing the dough to itself.

12. BENCH REST: Rest the 2 pieces of dough on the counter for 30 minutes. This will give them time to relax before shaping. Dust with flour and lightly cover with the same floury teatowel or plastic wrap you used earlier.

13. SHAPE: Shape each piece into a boule. Flip the dough over and give it a letter fold, give it a quarter turn, and then give it another letter fold. Place the seam down and pull it against the unfloured counter with your hands to tighten up the loaf. If the counter is unfloured, the dough will stick just a little bit as you pull it toward you, and this will help tighten the surface.

14. PROOF: Place each loaf seam-side-up into a proofing basket lined with a floured teatowel, or parchment. Let the dough proof for 1 to 2 hours. This is the final rise before it hops into the oven.

15. PREHEAT: While the dough is proofing, put an empty cast-iron Dutch oven inside the oven and preheat it to 475°F. This may seem early to preheat the oven, but great bread needs a thoroughly hot oven for the best results.

16. CHECK: To test that the dough is well proofed, press a finger gently into the dough. If it seems springy and tight, it needs more time. If it feels airy and light, like a marshmallow, it’s ready to bake. Don’t worry if your dough needs more time to rise.

17. BAKE: Carefully pull your very hot Dutch oven out of the oven and place it on top of the stove with the lid next to it. Carefully tip 1 loaf out of a basket into the Dutch oven, seam-side down. Make 2 half-inch deep slashes in the top of the dough with a razor blade or lame, making a big X. This will allow your loaf to expand upward in all directions and rise while it bakes without tearing. Cover the Dutch oven with the lid, slide it into the oven, and bake for 25 minutes.

18. CHECK: At 25 minutes, take the lid off the Dutch oven. Continue baking with the cover removed for another 15 to 20 minutes. Your loaf will get some colour and develop a nice crust. The finished loaf should be golden brown and will sound hollow when you thump it with your fingers. If the loaf seems to be browning too quickly, turn your oven down to 450°F. Repeat to bake the second loaf.

19. COOL: Let the bread cool on a wire rack for at least 30 minutes to let the interior crumb set and make it easier to slice. (Yes, really. You will ruin the texture of the loaf if you cut into it right away. Resist the temptation.)

20. STORE: Store bread in a cloth bag. Bread stored in a plastic bag will retain too much moisture, and will mould. Once the bread is cut, place it cut-side-down on the counter (inside the cloth bag).

A Little More Multigrain

Today’s sourdough adventure has a little more multigrain content than the last recipe I posted. (Do you see a pattern here?) It’s a denser, slightly heavier loaf, because it’s a combination of rye, Red Fife whole wheat, multigrain, and white bread flours. It didn’t rise as much as the previous recipes, but that’s to be expected.

I added a little more water than last time, too, because whole grain flours really soak it up. This was a fairly sticky dough, so I also used a little more bench flour during kneading. I find that rye flour tends to make stickier dough.

It’s in the oven now, and I can smell the multigrain as it bakes. Mmm.

I’ll take photos once it’s out of the oven and add them later. 🙂

I already know where I’m porch-dropping tonight’s extra loaf . . . so I’ll have to remember to take photos before I get in the car!

Here’s the recipe. It makes 2 loaves.

A LITTLE MORE MULTIGRAIN SOURDOUGH BREAD

FOR THE LEVAIN
• 100 grams ripe (fed) mature sourdough starter
• 150 grams rye flour
• 150 grams lukewarm water

FOR THE DOUGH
• all of the overnight levain
• 150 grams rye flour
• 150 grams whole wheat flour
• 200 grams multigrain bread flour
• 500 grams white bread flour
• 750 grams lukewarm water
• 20 grams salt

1. FEED YOUR STARTER: About 6-8 hours before you want to start this recipe, feed your starter to make sure it is active and has risen.

2. MIX THE LEVAIN: At least 12 hours before you plan to start mixing your dough, make the levain. Combine the mature starter, rye flour, and water, and mix well. Use a large container with adequate space for the starter to double in size, and a lid. Cover loosely with the lid.

3. CHECK: After 12 hours, check to see if your levain is full of air and has doubled in size. If you aren’t sure if it’s ready, use the “float test.” Drop a small piece of levain into a glass of water to see if it floats. If it doesn’t float, the levain needs more time to develop.

4. MIX THE DOUGH: Combine the prepared levain, flours, and water, and mix. The ingredients should come together easily and produce a shaggy firm dough. Don’t be tempted to add more water; the dough will feel wetter after it hydrates in the next step.

5. AUTOLYSE: Let the dough relax for about 30 minutes so the flour can absorb the water a bit, which will make it easier to knead.

6. ADD THE SALT: Sprinkle the salt over the dough. It will mix in as you knead.

7. KNEAD: Flour the counter and scrape the dough out onto it. (A dough scraper will help, because the dough will be sticky.) Flour your hands and gather the dough together. Fold the dough toward you, push forward into the dough with the heels of your hands, and give the dough a quarter turn. Fold the elongated dough back toward you, push forward with the heels of your hands, and give the dough a quarter turn. Fold, push, turn. Keep kneading until you can feel that the dough has tightened up and has gotten smoother, usually about 10 minutes. If the dough tightens too much, you can let it rest a few minutes and then continue kneading.

8. RISE: Cover the bowl (with a plate, or beeswax wrap, or a floured teatowel, or plastic wrap) and let the dough rise for 3 to 4 hours. Halfway through the rise, fold or knead it gently, but don’t punch it down too much, and don’t use a rolling pin. You don’t want to deflate all the air bubbles.

9. CHECK: After 3 to 4 hours, the risen dough should be lively, aerated, and buoyant. If you aren’t sure, fill a cup with water, pinch off a little ball of your dough, and drop it into the glass. It should float to the top, indicating that your dough is aerated. If it doesn’t seem particularly buoyant, it might be a cold day at your house. No worries. Let it rise a bit longer and check it again in 30 minutes or so.

10. DIVIDE: Gently turn your dough onto a floured countertop. If it is sticking to the bowl, use your hand or a plastic scraper to release it. Divide the dough into 2 equal pieces.

11. PRESHAPE: Shape each piece of dough by giving it a gentle letter fold: Fold the far side (12 o’ clock) down to the middle, sealing the dough against itself. Now fold the bottom up to meet the seam and seal it. Turn the dough so this seam is vertical, and do that letter fold again, sealing the dough to itself. You should have a nice little rounded square shape. If the dough is nice and tight, you can stop there. If it seems very relaxed, you can give it another set of letter folds to create more tension, sealing the dough to itself.

12. BENCH REST: Rest the 2 pieces of dough on the counter for 30 minutes. This will give them time to relax before shaping. Dust with flour and lightly cover with the same floury teatowel or plastic wrap you used earlier.

13. SHAPE: Shape each piece into a boule. Flip the dough over and give it a letter fold, give it a quarter turn, and then give it another letter fold. Place the seam down and pull it against the unfloured counter with your hands to tighten up the loaf. If the counter is unfloured, the dough will stick just a little bit as you pull it toward you, and this will help tighten the surface.

14. PROOF: Place each loaf seam-side-up into a proofing basket lined with a floured teatowel, or parchment. Let the dough proof for 1 to 2 hours. This is the final rise before it hops into the oven.

15. PREHEAT: While the dough is proofing, put an empty cast-iron Dutch oven inside the oven and preheat it to 475°F. This may seem early to preheat the oven, but great bread needs a thoroughly hot oven for the best results.

16. CHECK: To test that the dough is well proofed, press a finger gently into the dough. If it seems springy and tight, it needs more time. If it feels airy and light, like a marshmallow, it’s ready to bake. Don’t worry if your dough needs more time to rise.

17. BAKE: Carefully pull your very hot Dutch oven out of the oven and place it on top of the stove with the lid next to it. Carefully tip 1 loaf out of a basket into the Dutch oven, seam-side down. Make 2 half-inch deep slashes in the top of the dough with a razor blade or lame, making a big X. This will allow your loaf to expand upward in all directions and rise while it bakes without tearing. Cover the Dutch oven with the lid, slide it into the oven, and bake for 25 minutes.

18. CHECK: At 25 minutes, take the lid off the Dutch oven. Continue baking with the cover removed for another 15 to 20 minutes. Your loaf will get some colour and develop a nice crust. The finished loaf should be golden brown and will sound hollow when you thump it with your fingers. If the loaf seems to be browning too quickly, turn your oven down to 450°F. Repeat to bake the second loaf.

19. COOL: Let the bread cool on a wire rack for at least 30 minutes to let the interior crumb set and make it easier to slice. (Yes, really. You will ruin the texture of the loaf if you cut into it right away. Resist the temptation.)

20. STORE: Store bread in a cloth bag. Bread stored in a plastic bag will retain too much moisture, and will mould. Once the bread is cut, place it cut-side-down on the counter (inside the cloth bag).

Lightly Multigrain Sourdough

On Friday, I modified my basic sourdough recipe to include some rye and whole wheat flour.  I guess I’ll call it “Lightly Multigrain Sourdough” because it’s still mostly white bread flour. My husband prefers white bread to brown bread, so I’ll gradually ease him towards a 100%-whole-grain experiment. Shh.

Whole grain flours soak up a lot more water than white flour, so I also increased the amount of water in the dough, from 680 to 740 grams — purely guesswork on my part. The dough was a little stickier than in my Basic Sourdough recipe, but I guess I made up for that with bench flour during kneading.

This time, I added all of the rye flour into the levain, and all the whole wheat flour into the dough. I’m sure you could use white flour for the levain and put both the rye and whole wheat into the dough, but I haven’t tried that yet. I’ll experiment more with this recipe, and post again.

I used Red Fife whole wheat flour, because I like the idea of a heritage grain — Red Fife is the wheat that made Canada the breadbasket to the world in the period 1860-1900, and set the standard for Canadian wheat. For more information on Red Fife, please see https://www.thecanadianencyclopedia.ca/en/article/red-fife-wheat

Here’s the recipe:

LIGHTLY MULTIGRAIN SOURDOUGH BREAD

Makes 2 loaves

FOR THE LEVAIN
• 100 grams ripe (fed) mature sourdough starter
• 150 grams rye flour
• 150 grams lukewarm water

FOR THE DOUGH
• all of the overnight levain
• 300 grams whole wheat flour
• 700 grams white bread flour
• 740 grams lukewarm water
• 20 grams salt

1. FEED YOUR STARTER: About 6-8 hours before you want to start this recipe, feed your starter to make sure it is active and has risen. Always feed your starter with equal amounts of flour and water. If you have 200g of starter, add 200g of flour and 200g of starter. You won’t use it all in this recipe, so you will have some left to continue to grow.

2. MIX THE LEVAIN: At least 12 hours before you plan to start mixing your dough, make the levain. Combine the mature starter, rye flour, and water, and mix well. Use a large container with adequate space for the starter to double in size, and a lid. Cover loosely with the lid.

3. CHECK: After 12 hours, check to see if your levain is full of air and has doubled in size. If you aren’t sure if it’s ready, use the “float test.” Drop a small piece of levain into a glass of water to see if it floats. If it doesn’t float, the levain needs more time to develop.

4. MIX THE DOUGH: Combine the prepared levain, whole wheat and bread flours, and water, and mix. The ingredients should come together easily and produce a shaggy firm dough. Don’t be tempted to add more water; the dough will feel wetter after it hydrates in the next step.

5. AUTOLYSE: Let the dough relax for about 30 minutes so the flour can absorb the water a bit, which will make it easier to knead.

6. ADD THE SALT: Sprinkle the salt over the dough. It will mix in as you knead.

7. KNEAD: Flour the counter and scrape the dough out onto it. (A dough scraper will help, because the dough will be sticky.) Flour your hands and gather the dough together. Fold the dough toward you, push forward into the dough with the heels of your hands, and give the dough a quarter turn. Fold the elongated dough back toward you, push forward with the heels of your hands, and give the dough a quarter turn. Fold, push, turn. Keep kneading until you can feel that the dough has tightened up and has gotten smoother, usually about 10 minutes. If the dough tightens too much, you can let it rest a few minutes and then continue kneading.

8. RISE: Cover the bowl (with a plate, or beeswax wrap, or a floured teatowel, or plastic wrap) and let the dough rise for 3 to 4 hours. Halfway through the rise, fold or knead it gently, but don’t punch it down too much, and don’t use a rolling pin. You don’t want to deflate all the air bubbles.

9. CHECK: After 3 to 4 hours, the risen dough should be lively, aerated, and buoyant. If you aren’t sure, fill a cup with water, pinch off a little ball of your dough, and drop it into the glass. It should float to the top, indicating that your dough is aerated. If it doesn’t seem particularly buoyant, it might be a cold day at your house. No worries. Let it rise a bit longer and check it again in 30 minutes or so.

10. DIVIDE: Gently turn your dough onto a floured countertop. If it is sticking to the bowl, use your hand or a plastic scraper to release it. Divide the dough into 2 equal pieces.

11. PRESHAPE: Shape each piece of dough by giving it a gentle letter fold: Fold the far side (12 o’ clock) down to the middle, sealing the dough against itself. Now fold the bottom up to meet the seam and seal it. Turn the dough so this seam is vertical, and do that letter fold again, sealing the dough to itself. You should have a nice little rounded square shape. If the dough is nice and tight, you can stop there. If it seems very relaxed, you can give it another set of letter folds to create more tension, sealing the dough to itself.

12. BENCH REST: Rest the 2 pieces of dough on the counter for 30 minutes. This will give them time to relax before shaping. Dust with flour and lightly cover with the same floury teatowel or plastic wrap you used earlier.

13. SHAPE: Shape each piece into a boule. Flip the dough over and give it a letter fold, give it a quarter turn, and then give it another letter fold. Place the seam down and pull it against the unfloured counter with your hands to tighten up the loaf. If the counter is unfloured, the dough will stick just a little bit as you pull it toward you, and this will help tighten the surface.

14. PROOF: Place each loaf seam-side-up into a proofing basket lined with a floured teatowel, or parchment. Let the dough proof for 1 to 2 hours. This is the final rise before it hops into the oven.

15. PREHEAT: While the dough is proofing, put an empty cast-iron Dutch oven inside the oven and preheat it to 475°F. This may seem early to preheat the oven, but great bread needs a thoroughly hot oven for the best results.

16. CHECK: To test that the dough is well proofed, press a finger gently into the dough. If it seems springy and tight, it needs more time. If it feels airy and light, like a marshmallow, it’s ready to bake. Don’t worry if your dough needs more time to rise.

17. BAKE: Carefully pull your very hot Dutch oven out of the oven and place it on top of the stove with the lid next to it. Carefully tip 1 loaf out of a basket into the Dutch oven, seam-side down. Make 2 half-inch deep slashes in the top of the dough with a razor blade or lame, making a big X. This will allow your loaf to expand upward in all directions and rise while it bakes without tearing. Cover the Dutch oven with the lid, slide it into the oven, and bake for 25 minutes.

18. CHECK: At 25 minutes, take the lid off the Dutch oven. Continue baking with the cover removed for another 15 to 20 minutes. Your loaf will get some colour and develop a nice crust. The finished loaf should be golden brown and will sound hollow when you thump it with your fingers. If the loaf seems to be browning too quickly, turn your oven down to 450°F. Repeat to bake the second loaf.

19. COOL: Let the bread cool on a wire rack for at least 30 minutes to let the interior crumb set and make it easier to slice. (Yes, really. You will ruin the texture of the loaf if you cut into it right away. Resist the temptation.)

20. STORE: Store bread in a cloth bag. Bread stored in a plastic bag will retain too much moisture, and will mould. Once the bread is cut, place it cut-side-down on the counter (inside the cloth bag).

I recommend taking short notes about what time you completed each stage in the recipe above — makes it a lot easier when you’re trying to do other things!

Sourdough Success, Part II

I made the same basic kneaded sourdough recipe again, and I had the same results — better, maybe (see my previous post for the recipe). Sometimes the first time is a fluke, so I made it again, exactly the same way, and here’s how it looked:

To be clear, there were only 2 loaves, but I am a terrible photographer, and I wanted to make sure you could see that nice crust! There are no interior shots because I gave the loaves away before they were totally cool (and I still had half a loaf of the previous batch to eat).

I know that professional bakers like to bake their sourdough bread until it is a dark chestnut colour, and they say that the rich flavour of the crust permeates the crumb. I have not yet started to do that. I like the crust to be golden and crisp, but not too thick.

Sometimes the bottom crust darkens a little too much for me, but I have a plan for that too: when I cut a slice, I cut off the bottom crust and give it to my dog — because as soon as he sees me standing at the counter where I make/slice the bread, he’s right there with his very best puppy-dog eyes . . . and I’m a sucker for that.

Also, because it takes about 24 hours to make, from start to finish (longer if you count the time it takes to feed the starter and let it rise before making the levain), I have started making notes about what time I performed each step in the recipe — because sometimes I can’t remember. I’m working from home and, even though I’m working in the kitchen, sometimes hours go by and I forget what time I set the bread to rise!

On the topic of professional bakers, if you’re on Instagram, check out Matthew James Duffy (@matthewjamesduffy) — his photos and videos of sourdough, pizza, and bread are fantastic!

Sourdough Success!

Last night I baked a nice fluffy sourdough bread! I am so pleased with myself. This is the best sourdough recipe I have found yet! Crisp crust, tender crumb, some holes in the interior, but not hard and chewy. Pillowy interior. It has a nice flavour, but not a pronounced sour tang like some sourdough breads.

I had some for breakfast with peanut butter and jam, and it’s still good. I had some for lunch with butter, and I’m still pleased.

I had been searching for a sourdough-only recipe (no added commercial yeast) where I could knead the dough instead of stretch&fold — a recipe with lower hydration than those gloppy no-knead doughs. (My other sourdough-only attempts, with no-knead recipes, were only good when warm, and once they cooled, they were dense and too chewy, despite the holes. Good thing my dog liked it.)

I think this recipe worked for me for 3 reasons:

  1. I started discarding the required amount of starter when I feed it. Now my starter doubles (or more) within 4-6 hours of feeding it. And I have to make muffins or something with the discard (because I can’t bring myself to throw it away).
  2. The recipe calls for a levain made from my sourdough starter, which rises overnight, and then the rest of the dough is mixed in the morning.
  3. I kneaded the dough. Kneading activates the gluten, which creates a network of strands that trap the gas created by the wild yeast inside the loaf. I just don’t think this was happening with the no-knead recipes I had tried, because they stayed flat and flabby instead of rising. 

I’m not saying that no-knead bread won’t work for others — it just hasn’t worked for me. Probably my stretch&fold technique is lacking. But I love to knead bread. That’s part of the reason why I love making bread. Anyway, this worked, and I’m going to make it again. And then I’ll try it again, and vary the flours — I’d like to try it with Red Fife whole wheat and rye flours, and see how it turns out.

Here’s the recipe, slightly adapted from the original. It makes 2 loaves.

BASIC SOURDOUGH BREAD

FOR THE LEVAIN
100 grams ripe (fed) mature sourdough starter
150 grams bread flour
150 grams lukewarm water

FOR THE DOUGH
all of the overnight levain
1000 grams bread flour
680 grams lukewarm water
20 grams salt

  1. FEED YOUR STARTER: About 6-8 hours before you want to start this recipe, feed your starter to make sure it is active and has risen.
  2. MIX THE LEVAIN: At least 12 hours before you plan to start mixing your dough, make the levain. Combine the mature starter, flour, and water, and mix well. Use a large container with adequate space for the starter to double in size, and a lid. Cover loosely with the lid.
  3. CHECK: After 12 hours, check to see if your levain is full of air and has doubled in size. If you aren’t sure if it’s ready, use the “float test.” Drop a small piece of levain into a glass of water to see if it floats. If it doesn’t float, the levain needs more time to develop.
  4. MIX THE DOUGH: Combine the overnight levain, flour, and water, and mix. The ingredients should come together easily and produce a shaggy firm dough. Don’t be tempted to add more water; the dough will feel wetter after it hydrates in the next step.
  5. AUTOLYSE: Let the dough relax for about 30 minutes so the flour can absorb the water a bit, which will make it easier to knead.
  6. ADD THE SALT: Sprinkle the salt over the dough.  It will mix in as you knead.
  7. KNEAD: Flour the counter and scrape the dough out onto it. (A dough scraper will help, because the dough will be sticky.) Flour your hands and gather the dough together. Fold the dough toward you, push forward into the dough with the heels of your hands, and give the dough a quarter turn. Fold the elongated dough back toward you, push forward with the heels of your hands, and give the dough a quarter turn. Fold, push, turn. Keep kneading until you can feel that the dough has tightened up and has gotten smoother, usually about 10 minutes.  If the dough tightens too much, you can let it rest a few minutes and then continue kneading.
  8. RISE: Cover the bowl (with a plate, or beeswax wrap, or a floured teatowel, or plastic wrap) and let the dough rise for 3 to 4 hours. Halfway through the rise, fold or knead it gently, but don’t punch it down too much, and don’t use a rolling pin. You don’t want to deflate all the air bubbles.
  9. CHECK: After 3 to 4 hours, the risen dough should be lively, aerated, and buoyant. If you aren’t sure, fill a cup with water, pinch off a little ball of your dough, and drop it into the glass. It should float to the top, indicating that your dough is aerated. If it doesn’t seem particularly buoyant, it might be a cold day at your house. No worries. Let it rise a bit longer and check it again in 30 minutes or so.
  10. DIVIDE:  Gently turn your dough onto a floured countertop. If it is sticking to the bowl, use your hand or a plastic scraper to release it. Divide the dough into 2 equal pieces.
  11. PRESHAPE: Shape each piece of dough by giving it a gentle letter fold: Fold the far side (12 o’ clock) down to the middle, sealing the dough against itself. Now fold the bottom up to meet the seam and seal it. Turn the dough so this seam is vertical, and do that letter fold again, sealing the dough to itself. You should have a nice little rounded square shape. If the dough is nice and tight, you can stop there. If it seems very relaxed, you can give it another set of letter folds to create more tension, sealing the dough to itself.
  12. BENCH REST: Rest the 2 pieces of dough on the counter for 30 minutes. This will give them time to relax before shaping. Dust with flour and lightly cover with the same floury teatowel or plastic wrap you used earlier.
  13. SHAPE: Shape each piece into a boule. Flip the dough over and give it a letter fold, give it a quarter turn, and then give it another letter fold. Place the seam down and  pull it against the unfloured counter with your hands to tighten up the loaf. If the counter is unfloured, the dough will stick just a little bit as you pull it toward you, and this will help tighten the surface.
  14. PROOF: Place each loaf seam-side-up into a proofing basket lined with a floured teatowel, or parchment. Let the dough proof for 1 to 2 hours. This is the final rise before it hops into the oven.
  15. PREHEAT: While the dough is proofing, put an empty cast-iron Dutch oven inside the oven and preheat it to 475°F. This may seem early to preheat the oven, but great bread needs a thoroughly hot oven for the best results.
  16. CHECK: To test that the dough is well proofed, press a finger gently into the dough. If it seems springy and tight, it needs more time. If it feels airy and light, like a marshmallow, it’s ready to bake. Don’t worry if your dough needs more time to rise.
  17. BAKE: Carefully pull your very hot Dutch oven out of the oven and place it on top of the stove with the lid next to it. Carefully tip 1 loaf out of a basket into the Dutch oven, seam-side down.  Make 2 half-inch deep slashes in the top of the dough with a razor blade or lame, making a big X. This will allow your loaf to expand upward in all directions and rise while it bakes without tearing. Cover the Dutch oven with the lid, slide it into the oven, and bake for 25 minutes.
  18. CHECK: At 25 minutes, take the lid off the Dutch oven. Continue baking with the cover removed for another 15 to 20 minutes. Your loaf will get some colour and develop a nice crust. The finished loaf should be golden brown and will sound hollow when you thump it with your fingers. If the loaf seems to be browning too quickly, turn your oven down to 450°F. Repeat to bake the second loaf. 
  19. COOL: Let the bread cool on a wire rack for at least 30 minutes to let the interior crumb set and make it easier to slice. (Yes, really. You will ruin the texture of the loaf if you cut into it right away. Resist the temptation.) 
  20. STORE: Store bread in a cloth bag. Bread stored in a plastic bag will retain too much moisture, and will mould. Once the bread is cut, place it cut-side-down on the counter (inside the cloth bag).